
Water Marble Tutorial plus Tips & Tricks
If you Google "Water Marble How-To / Tutorial," you'll get about a zillion hits. How do you sift though the rubbish and go straight to the crème de la crème? Allow me. I've done it for you. Absolutely Required Reading & Watching
- Polish and Pearls has The Best video tutorial. Yes, it's a little long at 15 minutes, but it's all very helpful.
- Follow up with her pictorial post.
- And that's IT! Nobody else comes close to being as helpful as Polish and Pearls. If you'd like, search around Google Images for some color combo ideas.

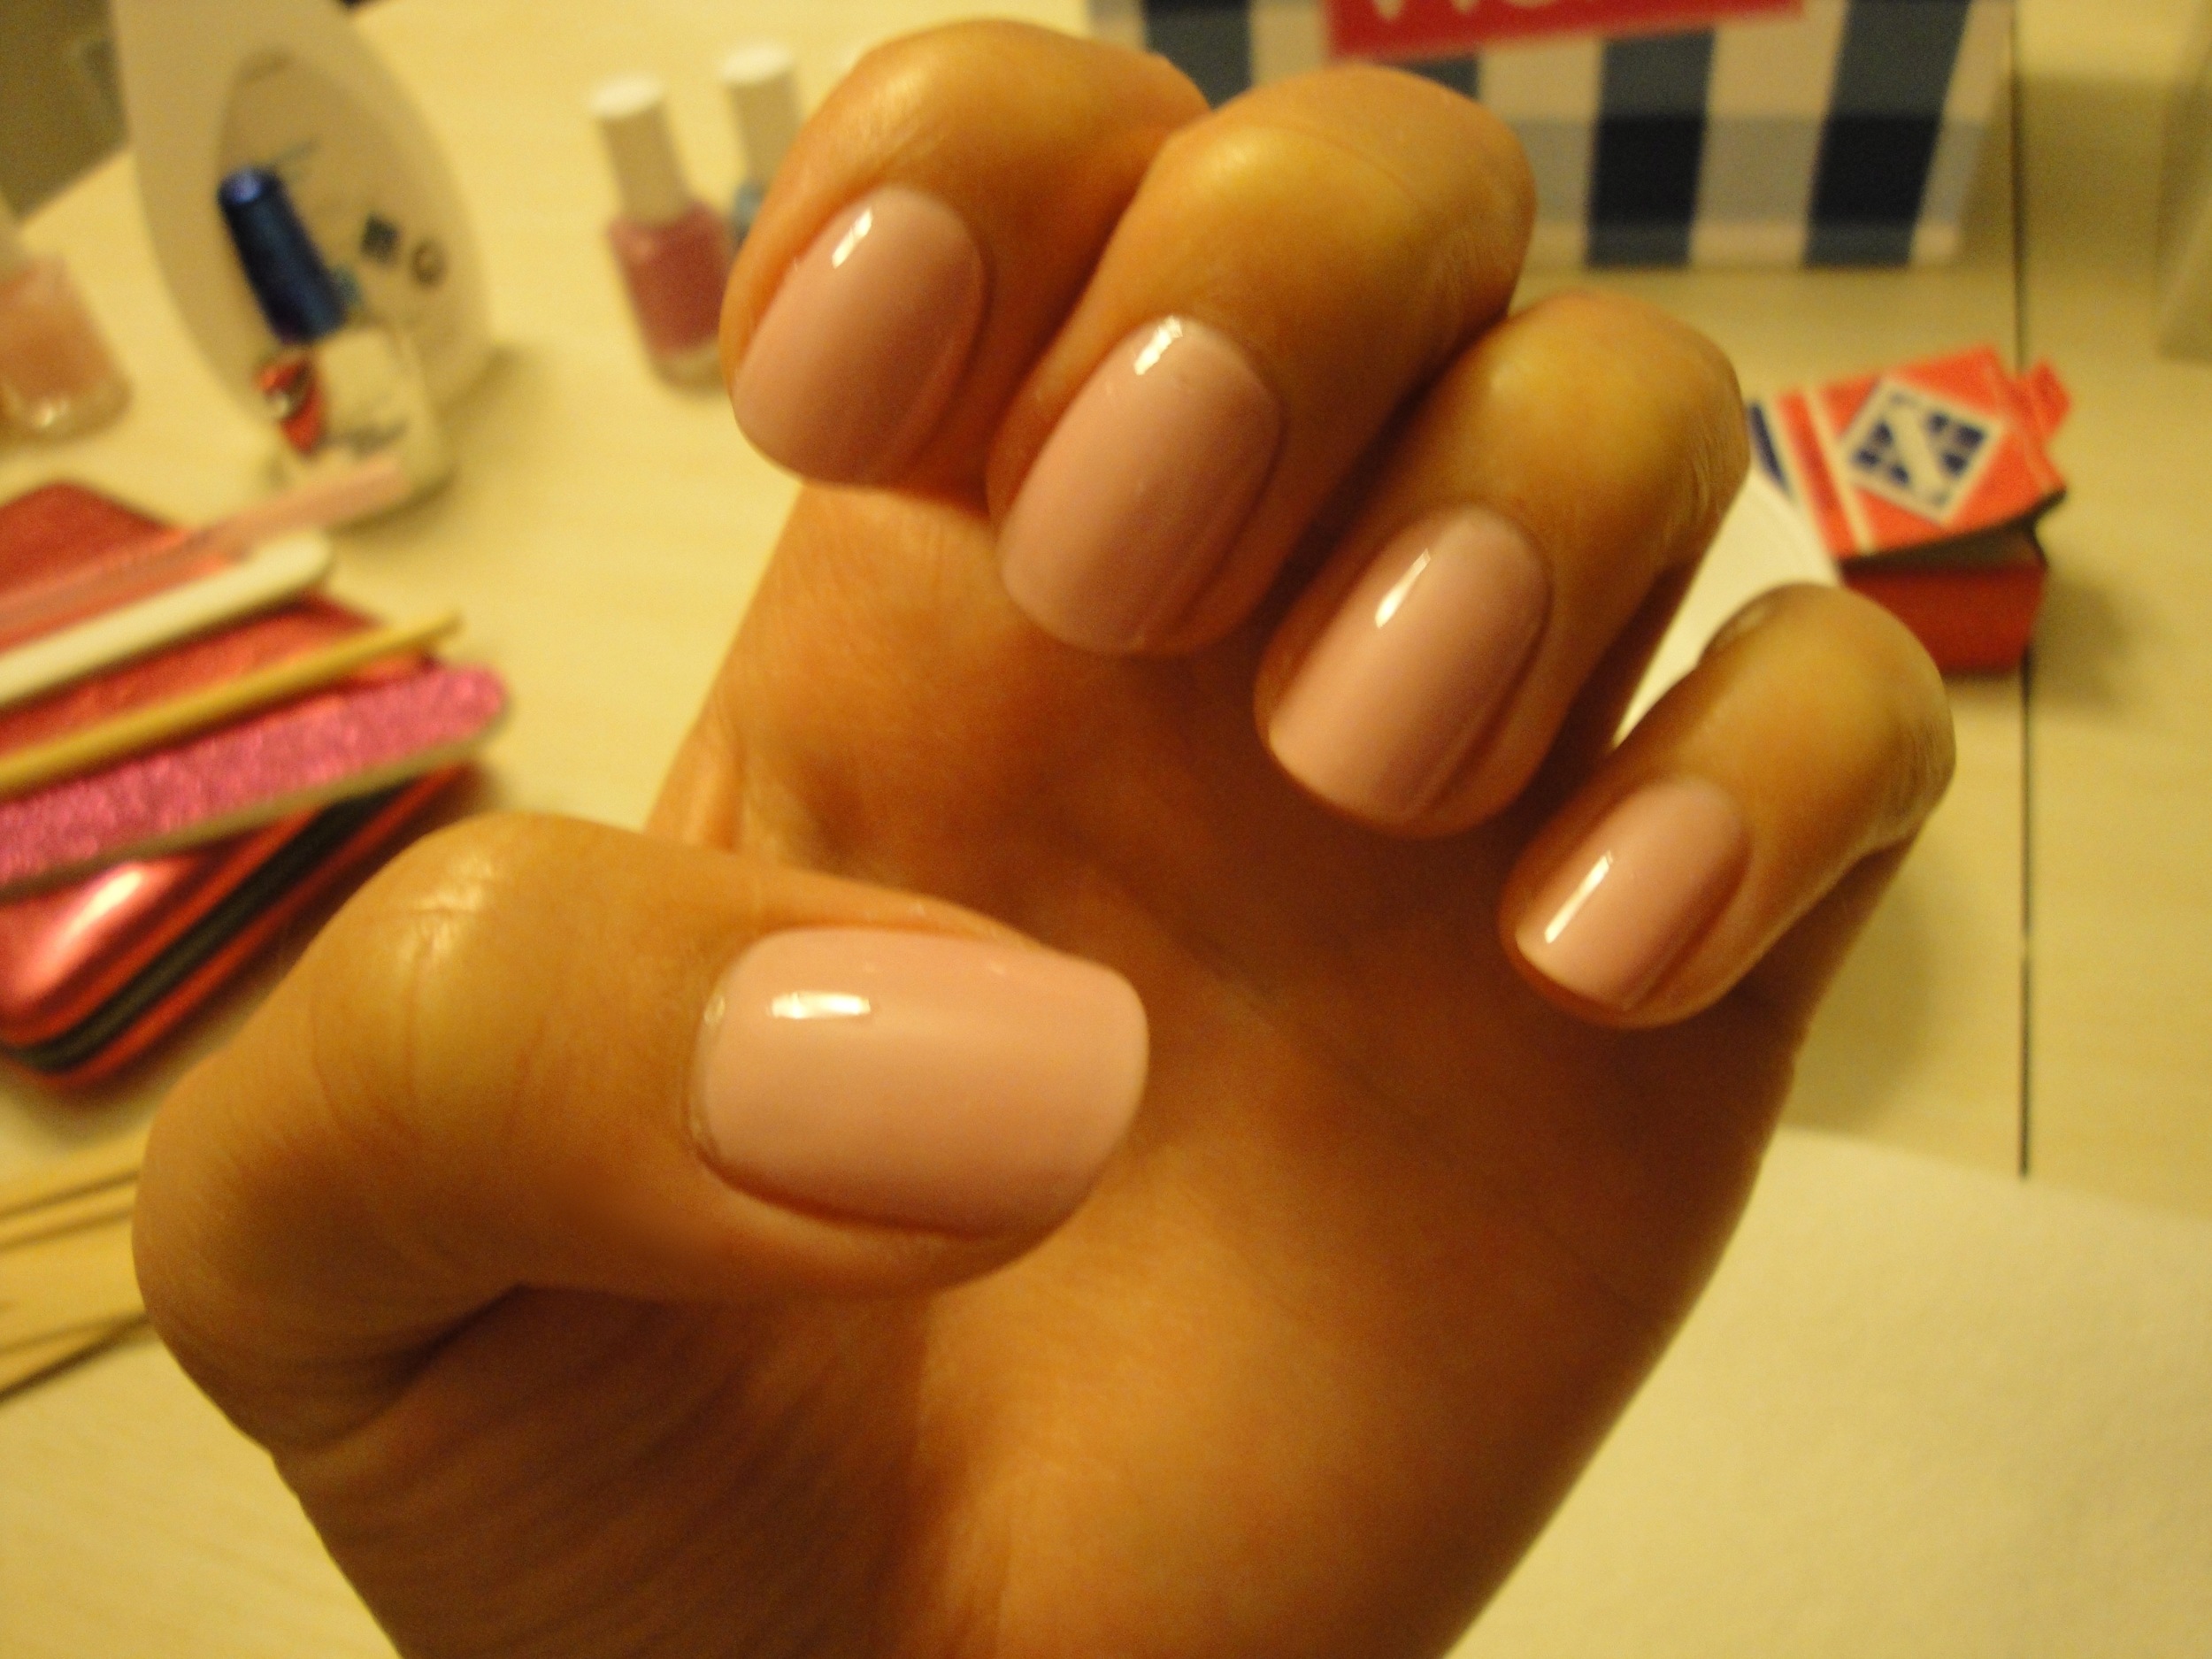
My Creation

Have No Fear
My number one takeaway was that this Water Marbling business is not as scary as it sounds. I didn't dive right in; I was well-prepared, and that was the key to my (relative) success. I haven't perfected it yet, but I learned a lot to share with you.
The GLOSS Notes Version
- Be brave.
- Be prepared.
- Be patient.
- Pick a light base color.
- Pick bold marble colors.
- Pick a manageable number of colors.
- Take a minute to experiment.
- Take a minute to tape.
- **LIGHTING DROPS**
- Take aim at that bull's eye!
- Take care of that extra polish floating around.
- Take a breather.
- Take that tape off.
- Top it off.
- Take a bow!
Aaand we're back! Here's the full list of tips & tricks.
The Best Water Marble Manicure Tips & Tricks
Patience & Planning
- I am guilty of putting on second coats too quickly. I am just as guilty as eagerly throwing on a top coat before I really should. This time, however, I knew I wasn't just painting my nails. Water Marbling is an Event. Capital E. I started at 6:00pm and was done by about 9:30pm. Time well-spent!
Be Prepared
- Gather your materials. Here was my check list:
- Water vessel of no consequence (well-washed Chinese take-out styrofoam bowl — keepin' it classy, what can I say?)
- Ample supply of room-temp, filtered water
- Straight-up acetone
- Nail files, clean up brushes, etc.
- Your ubiquitous office / Scotch tape
- "Placemat" made of Viva paper towels (nothing else will do)
- Ancient toothpicks
- Sizeable quantity of stolen Starbucks® wooden stirrers (it's for a good cause)
- Nail polish with tops unscrewed for speed
- Old nasty tweezers
- Sharp weapon (optional)

Base Color Is a Must
- Definitely paint a base coat and a base color.
- I was surprised to see how thin the "water marbled" coat of polish is that actually sticks to your nails. If you don't paint a base color, you'll have the dreaded VNL (visible nail line). I recommend an opaque, complimentary color... the lighter, the better. White is popular. I chose two coats of Essie Guchi Muchi Puchi, a chalky baby pink, over my usual Essie Ridge Filling base coat. Most of my time was spent letting this dry completely.
- Again, I stress: completely.
Be Bold!
- Maybe it's because I'm new at this, but the colors I picked ended up looking lighter than they usually do when I paint a normal manicure. This is because the layer of polish that goes on your nail, as I mentioned above, is very, very thin. Another reason is because my base color was so light.
- Keep in mind that whatever your "background"color is will affect the overall look & tone.
- Therefore, I suggest picking pigment-rich, bold colors for your marble swirls, since they'll lighten up a little.

Before You Dip...
- Give it a test run. Some polishes just don't work out, I am sorry to say. It has nothing to do with the brand. It has to do with the formula.
- One of my colors was supposed to be Essie Splash of Grenadine. I dipped a drop into the water and it completely disappeared. I thought nothing of it, and did my left pinky... Surprise surprise, Splash of Grenadine was invisible. I swapped it out for OPI Ate Berries in the Canaries, and it worked out well.
- Point is, if this is your first time, take a second to experiment with the "bull's eye," make sure your colors don't sink / disappear, and see for yourself how quickly the polish dries on the surface of the water. It dries so quickly that, if this is your first time, I really wouldn't get too ambitious here.
- Try 2-3 colors to make your bull's eye. Save 5-7 colors for your second Event.

Tape It Up
- I went for the tape method. I know some people say cuticle oil / vegetable oil / lotion / Vaseline work well, but I didn't want any foreign matter to contaminate my filtered water. So I opted for tape. This was my very last step before Dipping.
- I used three pieces for each finger.
- First, I cut off 30 little pieces about 1.5 - 2" long, then taped up all my fingers at once.
- I carefully put one piece of tape between my nail and my left "nail wall" (the left side of my nail) to keep polish from getting deep into that crevice.
- Then I repeated on the right side.
- I wrapped the excess tape around my finger to cover the finger pad.
- Then I taped at the top of my cuticle and actually covered a tiny, tiny bit of my nail.
- I... taped a little too well. I think I was cutting off some circulation and it got uncomfortable towards the end... I could see my bones through my skin, lol. But clean up was a breeze. Teehee!

FASTLIKELIGHTNING
- The nail polish bull's eye dries very, very FAST. Move quickly.
- Get the brush as close as you can to the water and let the polish drip off the brush into the water.
- Don't marvel at the color as it expands quickly... keep dropping drops. Gotta make that Bull's Eye FAST so that you can take your toothpick and draw designs while it's still really fresh.
- Experiment with designs.

Aiming Is Everything
- Because I didn't know too much about Water Marbling on a personal level, I had what we call... expectations. I thought it was really going to be like magic. I think the part that is most confusing to people is the actual "paint on nail / dipping" part of the whole procedure. It's really this simple:
- Bend your finger so your nail is able to "kiss" the water.
- Get your nail perfectly parallel to the water and get close to the surface.
- Take a second to aim.
- The part of the swirl that you hover your nail over is the part of the swirl that will end up on your nail. This sounds obvious, but I didn't realize what a small section of the bull's eye gets used, and I had better results once I started targeting the exact part of the pattern I wanted.
- Once you've picked your "swirl spot," plunge smoothly, being careful not to hit your nail on the bottom of your bowl / cup.
- Stay still for 10 - 15 seconds. Then...

Stir It Up, Little Darlin'
- Great Bob Marley song. But I digress.
- I made a few boo-boos because I didn't get all of the extra nail polish floating around on the water out of my vessel before I removed my fingers. Don't make this mistake. Use your stolen Starbucks® stirrer and swish it all away! The water should be clean and clear before you take your finger out.

Pause, Please!
- I waited about three minutes after completing my dips before I moved on to removing tape.
- It wasn't working out so well — I got really anxious about biffing my hard work — so I did something a little edgy.
- And by "edgy," I mean I whipped out my X-acto knife. Meow!! Not for kiddies, okay?
- I carefully sliced the tape on top of my finger, cutting up and away, and then I removed the tape easily with a pair of old tweezers.

A Note About the Top Coat
- My top coat (my fave, Sally Hanson MegaShine) ate away some of my marbling. :-/ It's slight, and I hope nobody notices... but I do. I think I was moving the brush too slowly. Just a heads-up. At least it got rid of the bubbles! See below.


Piece of Cake (?!)
I know this is intense. But I hope it was also informative. If you have some great tricks of the marbling trade you'd like to share, please comment!

phewxxo, GLOSS
P.S. BONUS PHOTO! See the scratch on my hand? There's the beast who did it, bottom right! My foster kitten, Pepper!
