"Wizard Hat" Mani

The last time I went to my nail supply shop, I saw some crazy colored star-shaped nail accents that I couldn't resist. They came in pastel pink, mint and yellow, each pack containing five stars. I was in the mood for something whimsical, so stars it was! I had a bottle of OPI Tomorrow Never Dies from the Skyfall collection, a gorgeous metallic indigo and I had some silver glitter on hand, and thus a plan was born.

Good Night Moon Mani_1

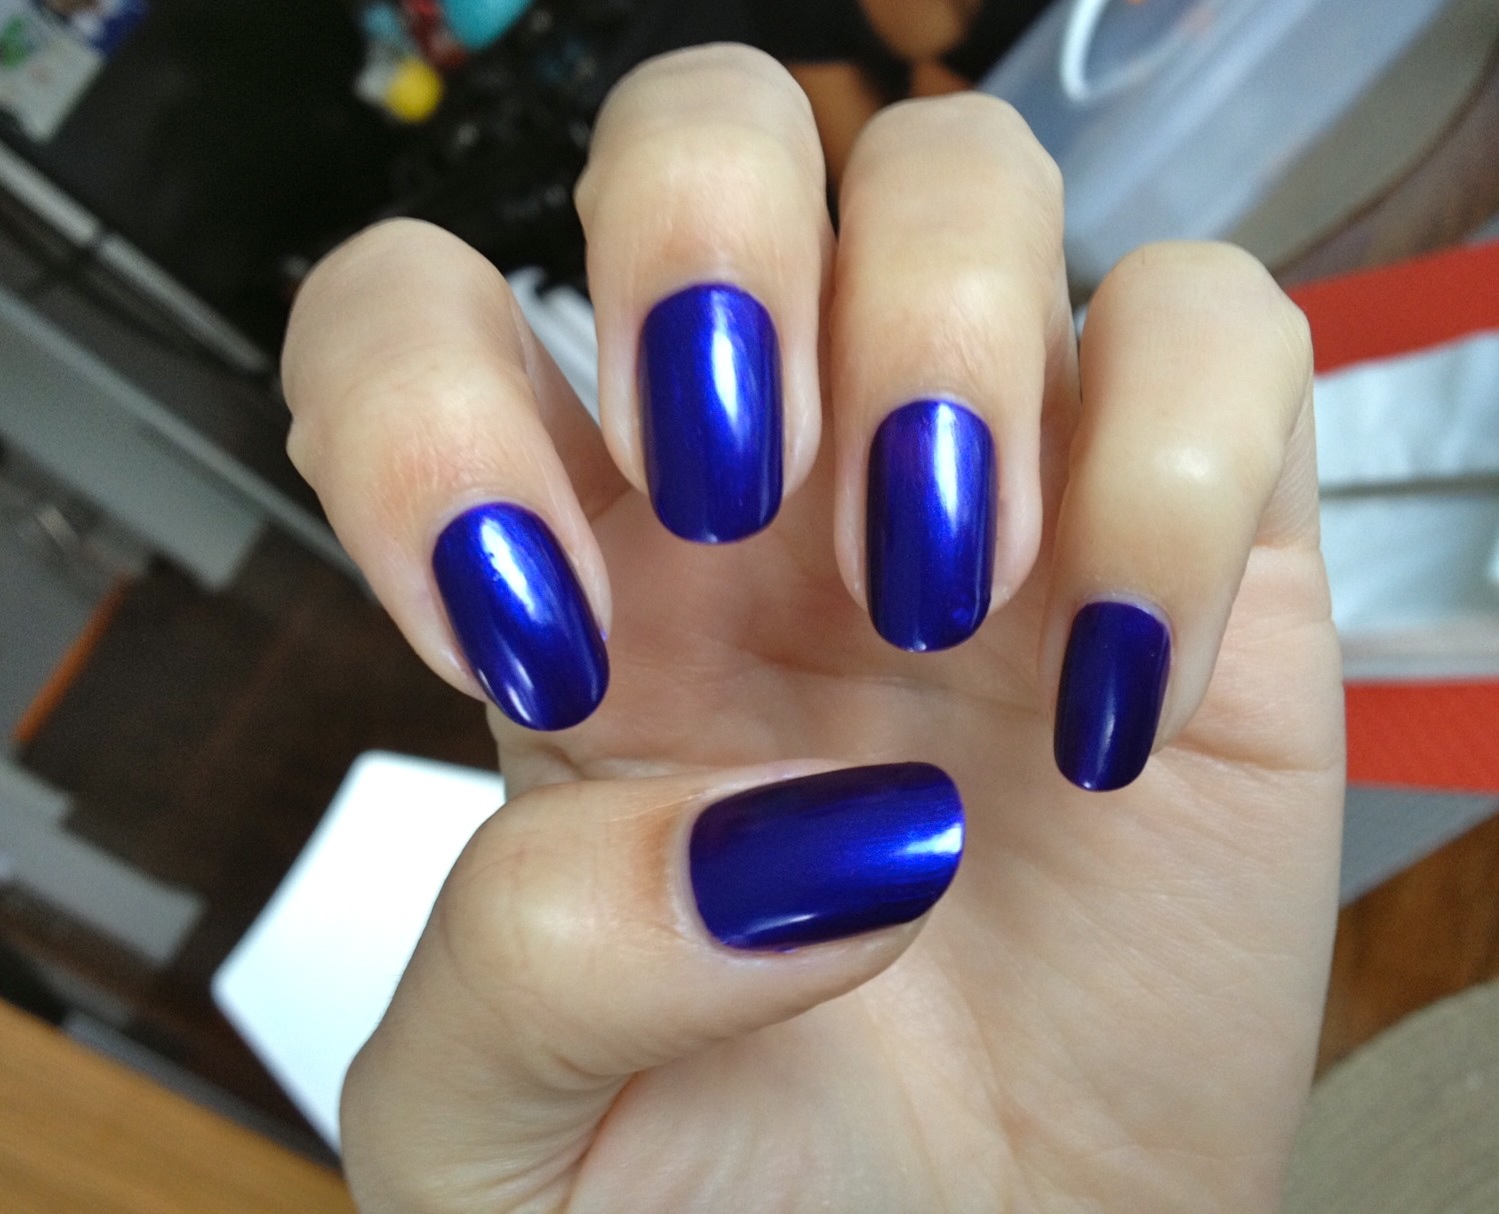
I applied two coats of OPI. Next, I used a toothpick to apply silver glitter in a purposeful way. Some of my nails feature real constellations; others are just well-strewn "stars." The final touch was adding the pastel yellow stars. I used a generous dab of Seche Vite and let the stars set, then applied a nice, thick coat of Seche Vite, completely covering the stars to make sure everything stayed put. I also wanted to be sure that there wouldn't be any edges along the stars for my hair to snag on. Blegh.

Good Night Moon Mani_2

Here's my left hand in indirect sunlight on the way to work.

And my right hand in the bright sunshine!

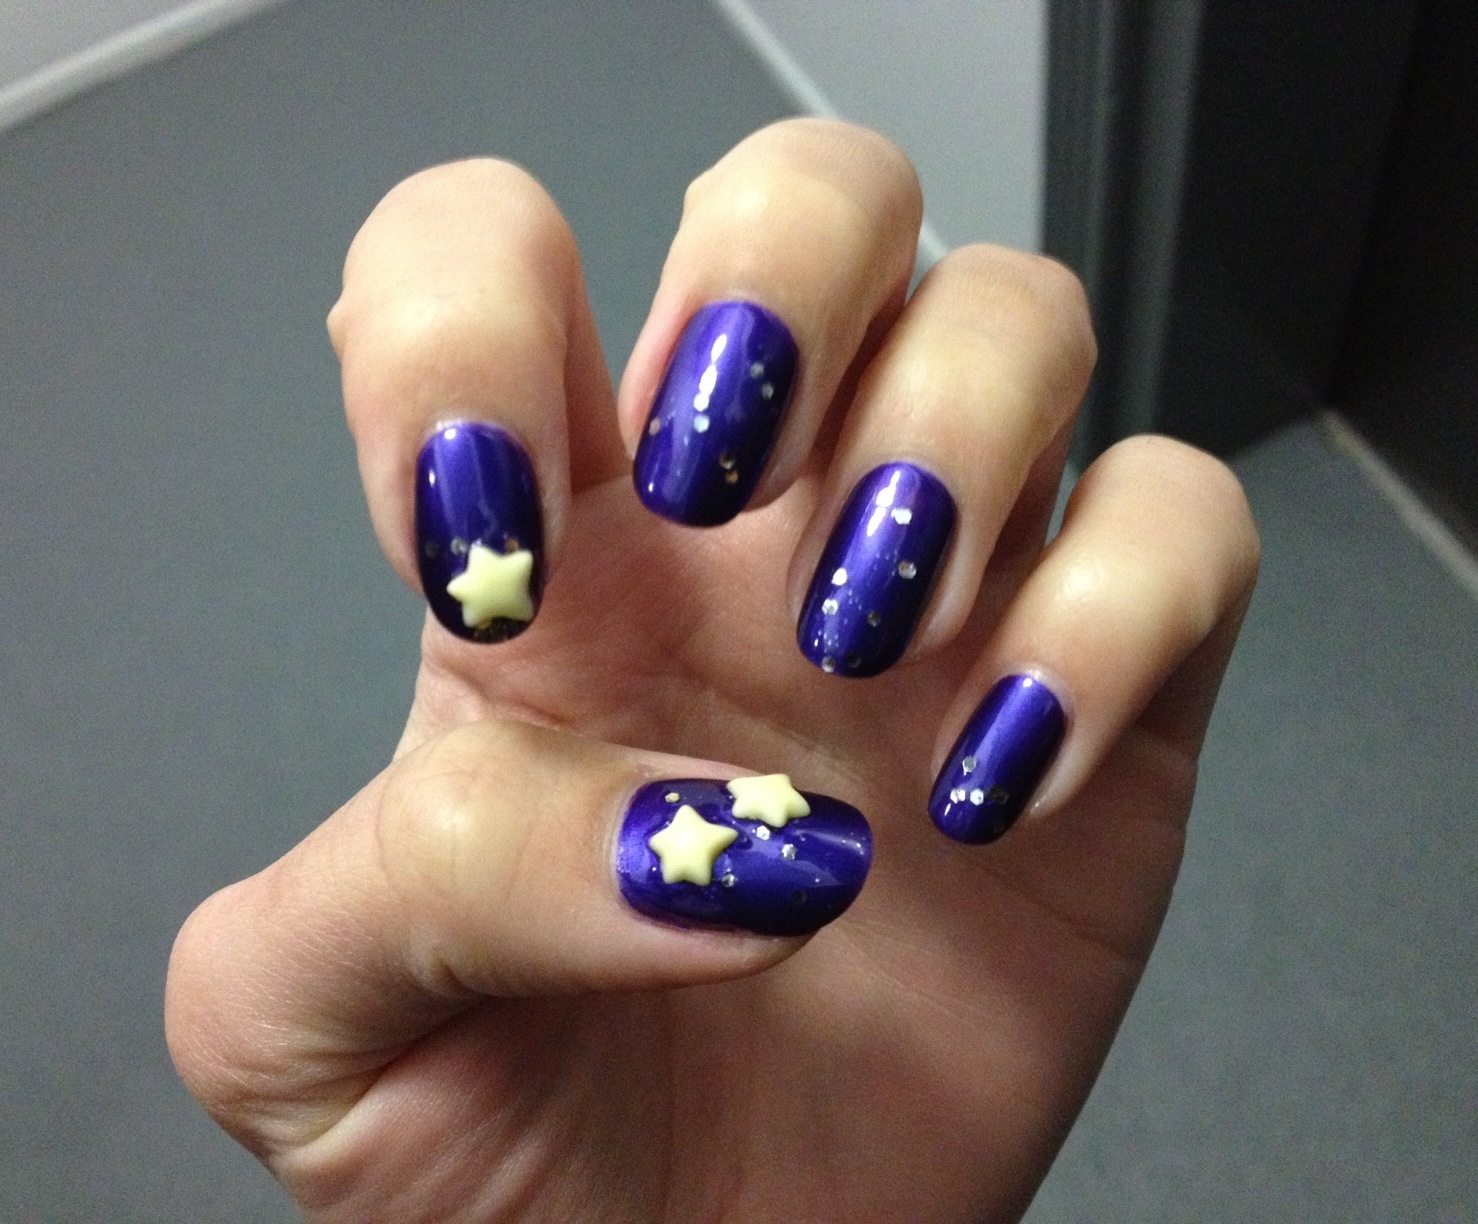
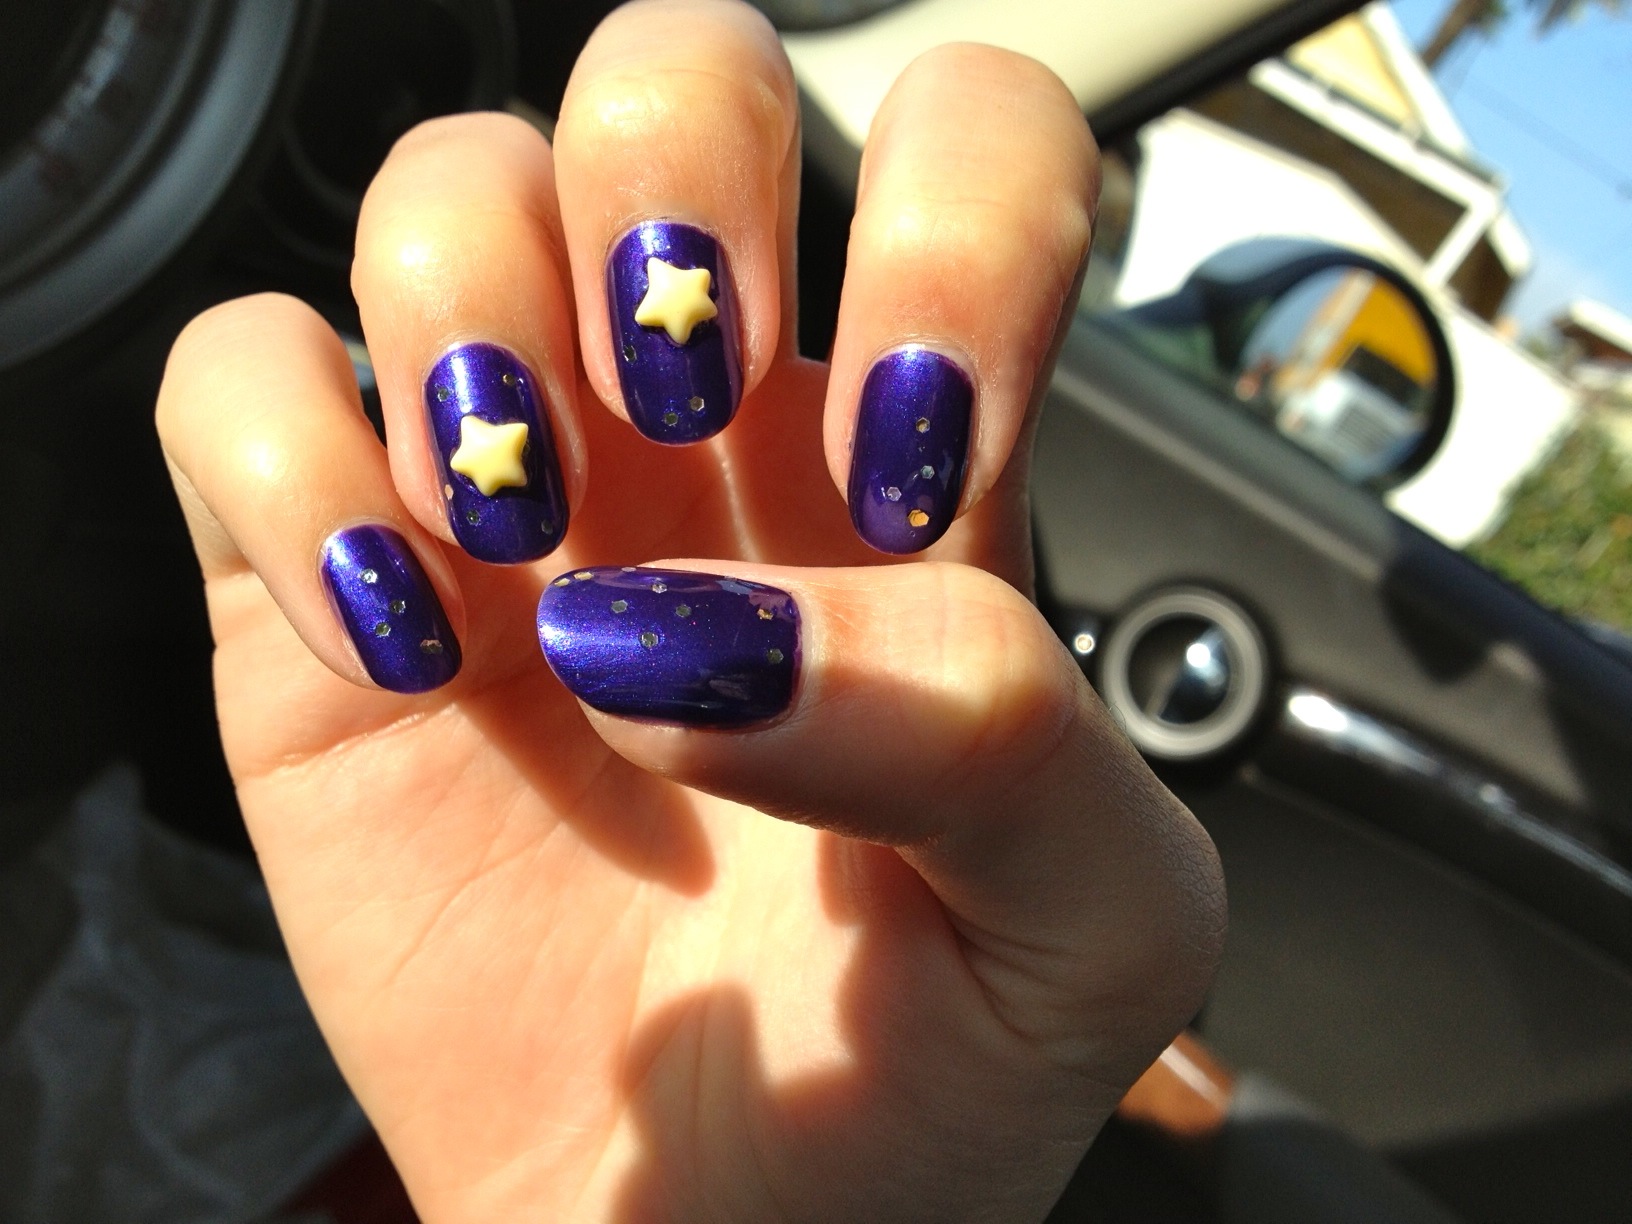
Since the stars are kind of kitchsy and cutesy, the resulting look was a little child-like and reminded me of Good Night Moon... or a wizard.

wizard costume

That said, I got a huge kick out of having such a playful manicure. The best part of the mani was touching the stars on my nails. They felt a little alien, but I was down with the weirdness.

Have you guys ever tried any super-sized nail decals?

ohmystars! Francesca

[youtube=http://youtu.be/ThHz9wlBeLU]

The Oh-So-Glam Gold Glitter Gelicure

Ever since my friend Andi treated herself to a Rockstar Manicure at Pampered Hands on Melrose, I've been dreaming of doing the same. Remember this?

Over the holidays, I finally treated myself. I figured I'd be socializing and catching up with my nearest and dearest, so spiffing up my claws was really the least I could do.

Pampered Nails is, hands-down, my favorite salon in Los Angeles. It's my go-to place for a reliable mani/pedi. Great service, affordable pricing, bustling atmosphere, huge selection and free boba smoothies. A dream come true.

Getting the manicure was just as much fun as sporting it; it felt like a very intense crafting project. First, Gelish brand foundation gel was applied and cured. Next, a second thin layer of Gelish foundation gel was added and then the dipping commenced!

Pampered Hands has at least 250+ glitters to choose from, so the whittling down the selection was pretty tough — so many glorious, glittery choices! I finally decided to go for gold, but even that left me with a ton of contenders. I opted for a glitter that was a cooler, more champagne-y gold rather than yellow gold. I especially liked my choice because this glitter had several sizes and shapes of specks, which I thought would yield a nice layered affect and really give the sparkle some depth, too. If you go, it's called "T-1."

So a large jar of loose glitter in my color of choice, T-1, was brought over. The second thin layer of foundation gel was still wet, and my fingertips were dipped into the jar one by one. When my finger emerged, it was completely covered in glitter. My nail technician gently patted down each nail with her finger to make sure the glitter was adhering to the gel beneath it. She cleared away extra glitter and moved along to the next nail.

After all of my nails were patted and complete, I cured away under the UV light again. Next, the nail technician got out a pot of clear gel polish and painted it on with a separate brush. (I think it's because she was able to wipe the brush off on a towel if needed, rather than contaminate a gel bottle with whatever color glitter she was using.) And then I cured again! Last but not least, a thin layer of clear topcoat was applied and voila, I was done.

Gold Glitter Gelicure_Pampered Hands_2 Gold Glitter Gelicure_Pampered Hands_3 Gold Glitter Gelicure_Pampered Hands_4 Gold Glitter Gelicure_Pampered Hands_6 Gold Glitter Gelicure_Pampered Hands_7

A Rockstar Manicure is more intense and a little more expensive than a normal gel manicure, but it was totally worth it. I couldn't have been happier; I got nonstop compliments for two weeks and had so, so much fun wearing these gorgeous nails. I was sad to see them go!

Cranberry White Chocolate Chip Cookies, with a dash o' glitz.

Nailz & I had a lot of fun at The Getty Villa. Gorgeous day!

Photo's out of focus, I know, but I wanted to show the way these nails just twinkle away.

All in all, I think the Rockstar Manicure was $60; not cheap by a long shot. But for glittering, gorgeous nails that made me feel like the life of the party and stayed flawless through cookie baking, holiday kitchen cleanup and lots of hands-on activity, it was worth the splurge.

staygolden, Francesca

I treated my mom to ocean view cocktails at Shutters on the Beach when she came to visit. A must when you're in town!

OPI — Can't Let Go (Liquid Sand)

OPI_liquid sand_mariah I'm going to ask the question that's on everyone's mind: What happened to Mariah Carey?

It's kind of like there are two Mariahs. There's the Music Box / Daydream / Butterfly Mariah that loves rich colors like camel and cocoa, mixed with stark blacks and soft grays. A touchable, flirtatious, womanly Mariah. And then there's post-Glitter Mariah that bedazzles everything, prefers to eat reclining on a chaise lounge (am I the only one who saw her Cribs episode?) and dresses mainly in pink.

Before.

After.

What a face...

What the...

So I guess it's fitting that the new OPI Mariah Carey Collection reflects her... dual nature. Some of the colors are sophisticated while others are major glitz. The collection is literally divided into "Studio Shades" (metallics and cremes) and "Stage Shades," which are all in the new Liquid Sand formula.

Top row, from left: A Butterfly Moment, Sprung, Pink Yet Lavender, and Anti-Bleak.Bottom row, from left: Stay The Night, Get Your Number, Can't Let Go, and The Impossible.

I was really eager to try one of the Liquid Sands. A new formula from OPI is a big deal! I lurve purple, so I chose Can't Let Go*.

OPI_liquid sand_indirect

Here's CLG in the sun. See the gritty texture?

The was entranced by these.

Can't Let Go has his Seal of Approval,

I love OPI's new Liquid Sand formula! It reminds me a lot of a velvet manicure, but it's much easier to do and not messy at all. A nice touch is that the sandy texture has a matte look, but the glitter embedded in the shades adds depth and sparkle to keep your nails from looking completely dull.

I'd recommend buying a bottle of Liquid Sand if you like purple or charcoal shades; the turquoise "Get Your Number" and strawberry "The Impossible" are a little much. Can't Let Go (purple) and Stay The Night (charcoal) are versatile enough to integrate into your nail wardrobe.

One more thing to share: I get nervous about daring formulas like Liquid Sand. They're generally declared a hit and explode, like Shatter (and its countless impostors) did, or they're a quickly abandoned experiment and become HTFs. So if you're thinking of investing, don't wait too long.

The Polish Aholic swatched the entire Mariah Carey collection. Click the pic to check out her post and admire her great shots.

Anyone thinking of trying a Liquid Sand Shade?

xxo, Francesca

*product provided for honest review

And Now, Some "Social" Commentary

Hello girls. (And guuuuys.)  I'm finally gittin' hip to that there Instagram. It's taken me a while but I'll admit, I'm digging it. I was thinking Instagram would be a great way to share with you guys all of the great manis I see at my office, on my travels (and by "travels," let's face it, I'm referring to "errands") and more. So if you like cats & nail polish, just follow me @francescanunez and you'll get more than your fair share of both. And maybe even the occasional baked good or two.

Theodore Arthur modeling his charming new wooden bow tie ID tag from the Etsy shop Cropscotch.

And the lovely Olivia Lily, sporting a custom-made 2D "gem."

Where else can you get photos like these?? (Do not say "the whole Internet.")

Another digital property I haunt is Polishment: THE BOARD, my Pinterest board dedicated to the nail and nothing but the nail. I pin pretty frequently, and it's become a great source of inspiration for new products, color combos to try, manicure tips & tricks, and easy DIY nail art. There are some Sunday nights when I'm stumped as to what to try next; a quick peek at my Polishment board leaves me with a plan of attack every time. I hope it helps you, too!

polishment_the board_010813

Look at my Pinterest bait. Mwahaha.

If any of you have nail polish blogs / Instagrams / Pinterest boards you wanna share, whether it's yours or just one of your faves,  please do so in the comments! Let's make this post a friendly forum for nail polish hot spots on the Web.

xxo, Francesca

Ciaté Mini Mani #1 — Cupcake Queen

ciate_cupcake queen_pose Now I know that when I posted about my gorgeous Ciaté Mini Mani Month box, I claimed I'd do a manicure a day... Welp. That obviously hasn't happened — but wait, there's a reason, I swear!

It's because the colors have been on the demure side. Don't get me wrong, I love a good pink or bordeaux, but I've been in the mood for some unusual nail colors and none of the mini bottles have been getting my wheels a-turning, aside from Numero Uno.

The first bottle to be revealed was Cupcake Queen, a bright magenta with (gasp) a violet sheen. It was totally late 80s. I think Barbie may have had a Corvette or two like this. It didn't scream sophistication, to be sure. Cupcake Queen? Maybe. But think Hostess, not Sprinkles.

Just look at how cute these little bottles are.

See that shimmer? When I see colors like this, I just... Phew. Flashbacks. I didn't know colors like this still existed.

And yet the pink looked bright enough for a look I'd been meaning to try — freehand leopard spots! I was inspired by this page in a Sephora catalog that I've been hoarding for a year and a half. /wink

My inspiration. My tools.

Here's my left paw in the shade.

And some early morning California sunshine.

These spots were incredibly easy to do! All you need is a dotting tool (or even a bobby pin) and a good black striping polish.

I used a black striping polish from The New Black. What a great buy; the polish is pigment-rich, super smooth and even dries pretty fast. The brush itself is perfect, too. Using the brush, I drew little half moons and circles, being sure to make the edges of the moons and circles a bit wobbly and uneven looking so that they'd look like stylized leopard spots instead of straight-up polka dots. The organic look we're going for really comes in handy when it's time to paint your non-dominant paw. ;)

Then I used my dotting tool and my Konad white stamping polish to add small white dots in varying sizes on most (but not all) of my black half moons and circles. I nearly reached for my trusty OPI Alpine Snow, but I was worried about transparency issues — and nothing's more opaque than Konad.

I enjoyed this look so much that I couldn't bear to remove it the next night! Or the night after that. So now you've discovered the second reason why my manicure-a-day plan didn't make the cut.

quitethecupcakequeen, Francesca