Swatch 'n' Learn! Ciaté — Very Colourfoil Manicure™

colorfoil_example Back in January, I stumbled upon the Ciaté "Very Colourfoil Manicure™" kit on Sephora.com. And I was fascinated At the time, nobody had swatched them, so I was left to my own musings. Until now.

What can I say... I splurged! May I present the photo evidence of my first foray into foil manicures. Allison, this one's for you!

Very ColorFoil_Box

Very ColorFoil_Unpacked

I still have no idea why this was included, lol

A new full-size Ciaté is always welcome!

This is a little bottle of "Foil Fix." It reminded me a lot of watered-down Elmer's Glue.

The instructions were a little intimidating, but the process was actually very simple. You paint the Foil Fix where you want the foil to stick; the entire nail, just a section, just a dot, etc. Let the Foil Fix dry for 60 seconds or so... Press the foil down on the nail, shiny side up... Rip off and VOILA.

Speaking of foil... look at these awesome colors! The sheets of foil were incredibly thin. Even thinner than a Listerine Strip. (Anyone remember those??)

The foils came in this cute little envelope. It comes in handy because you'll find you have a ton of foil left! I only used one sheet of each color for my look. I could do at least 6-7 more foil manicures with the materials included in the kit.

Since there was no legitimate reason to only use the color of polish that came with the kit, I decided to add two colors to the mix; OPI "The IT Color" and Essie "Pretty Edgy."

Very ColorFoil_Foil

I had a lot of fun looking at this mani. I did mine a little crazy, but you could do a much more subtle look, limiting yourself to a base color and then using just one or two colors of foil for a simpler look.

A few days later, my foils really started to fade.

If you compare this photo to earlier shots, you can really see the disappearing foil.

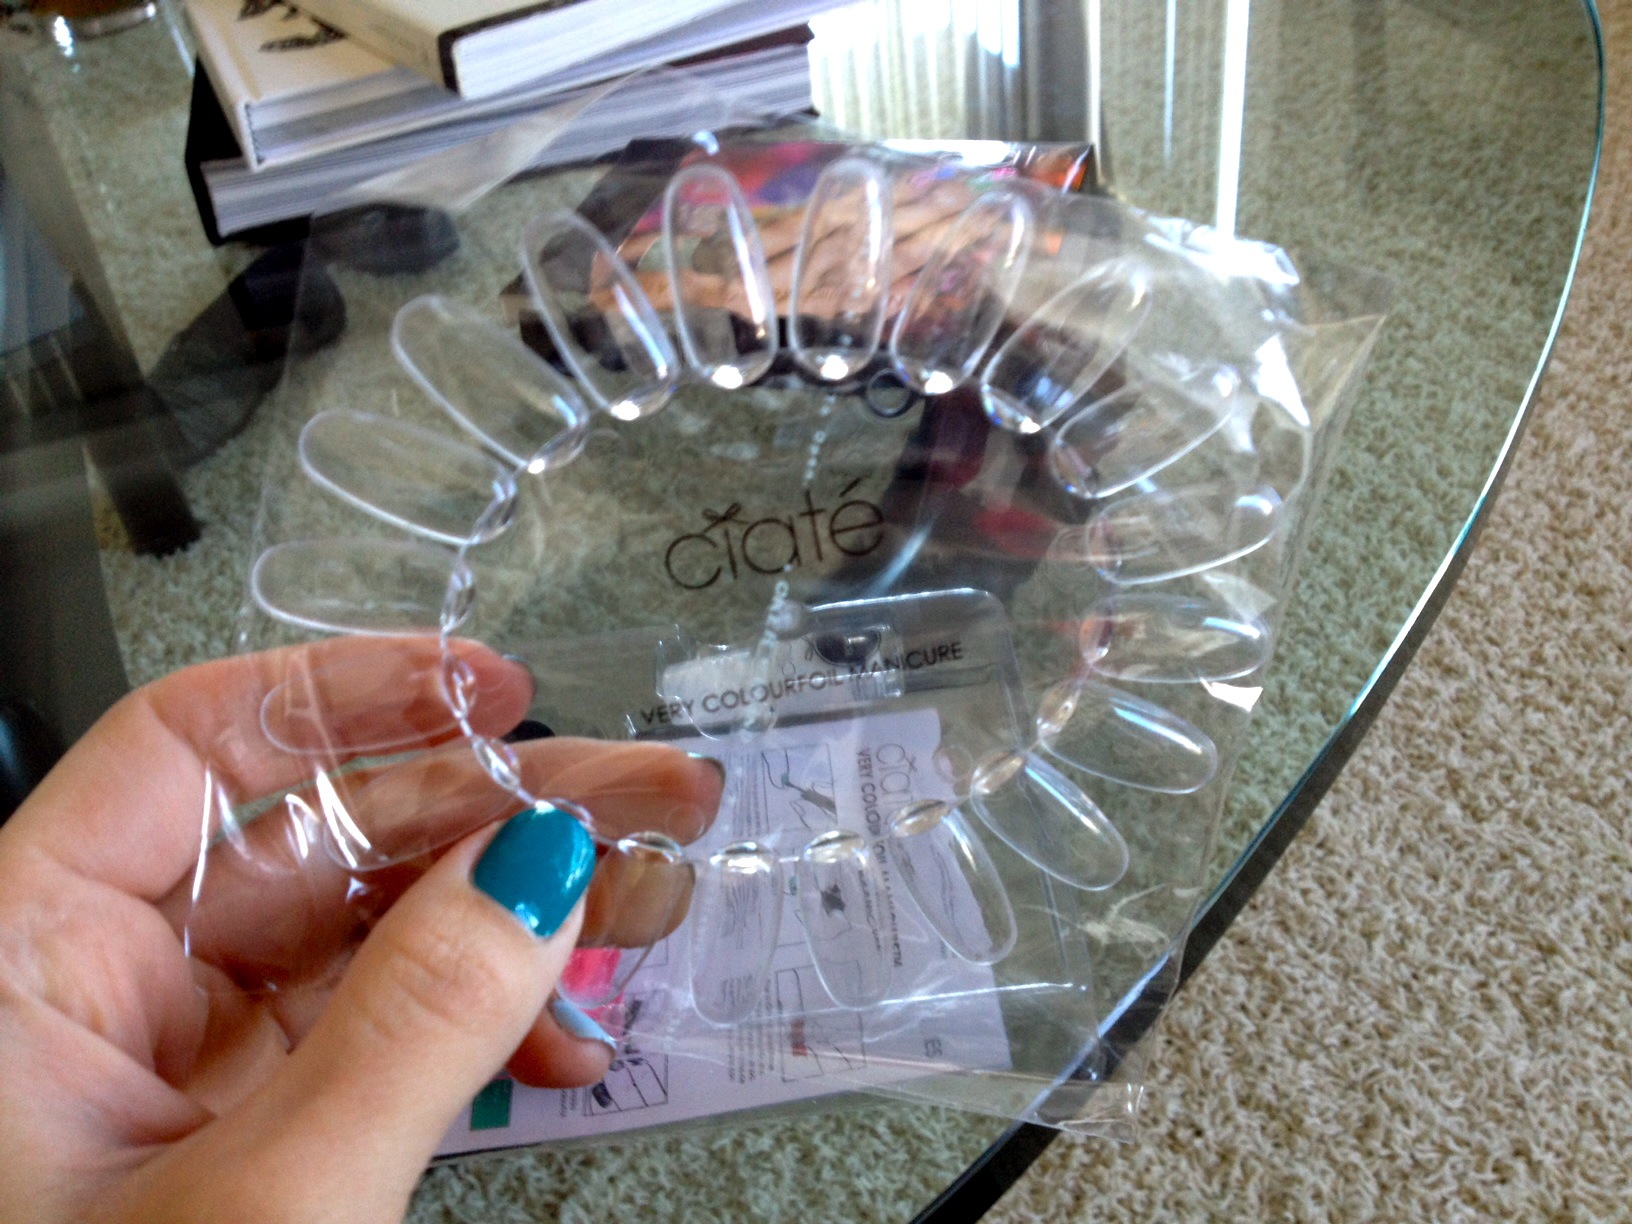
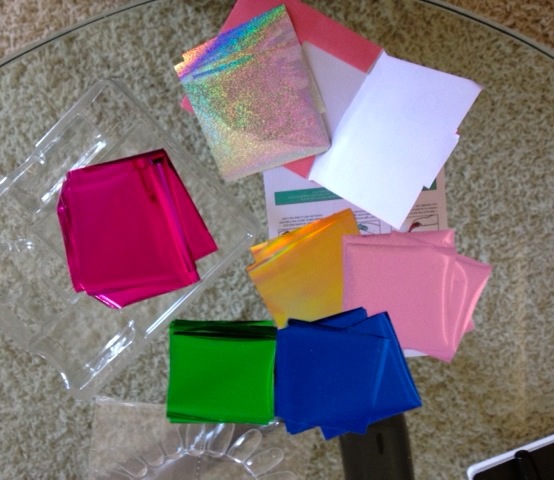
Although the kit was an indulgence at $19, I've decided it's actually a great deal. You get a full bottle of Ciaté "Paint Pots" polish, which retails for $15. You get the bottle of Foil Fix. And then you get tons of foils. Again, I have to stress how generous this kit is with the foil.

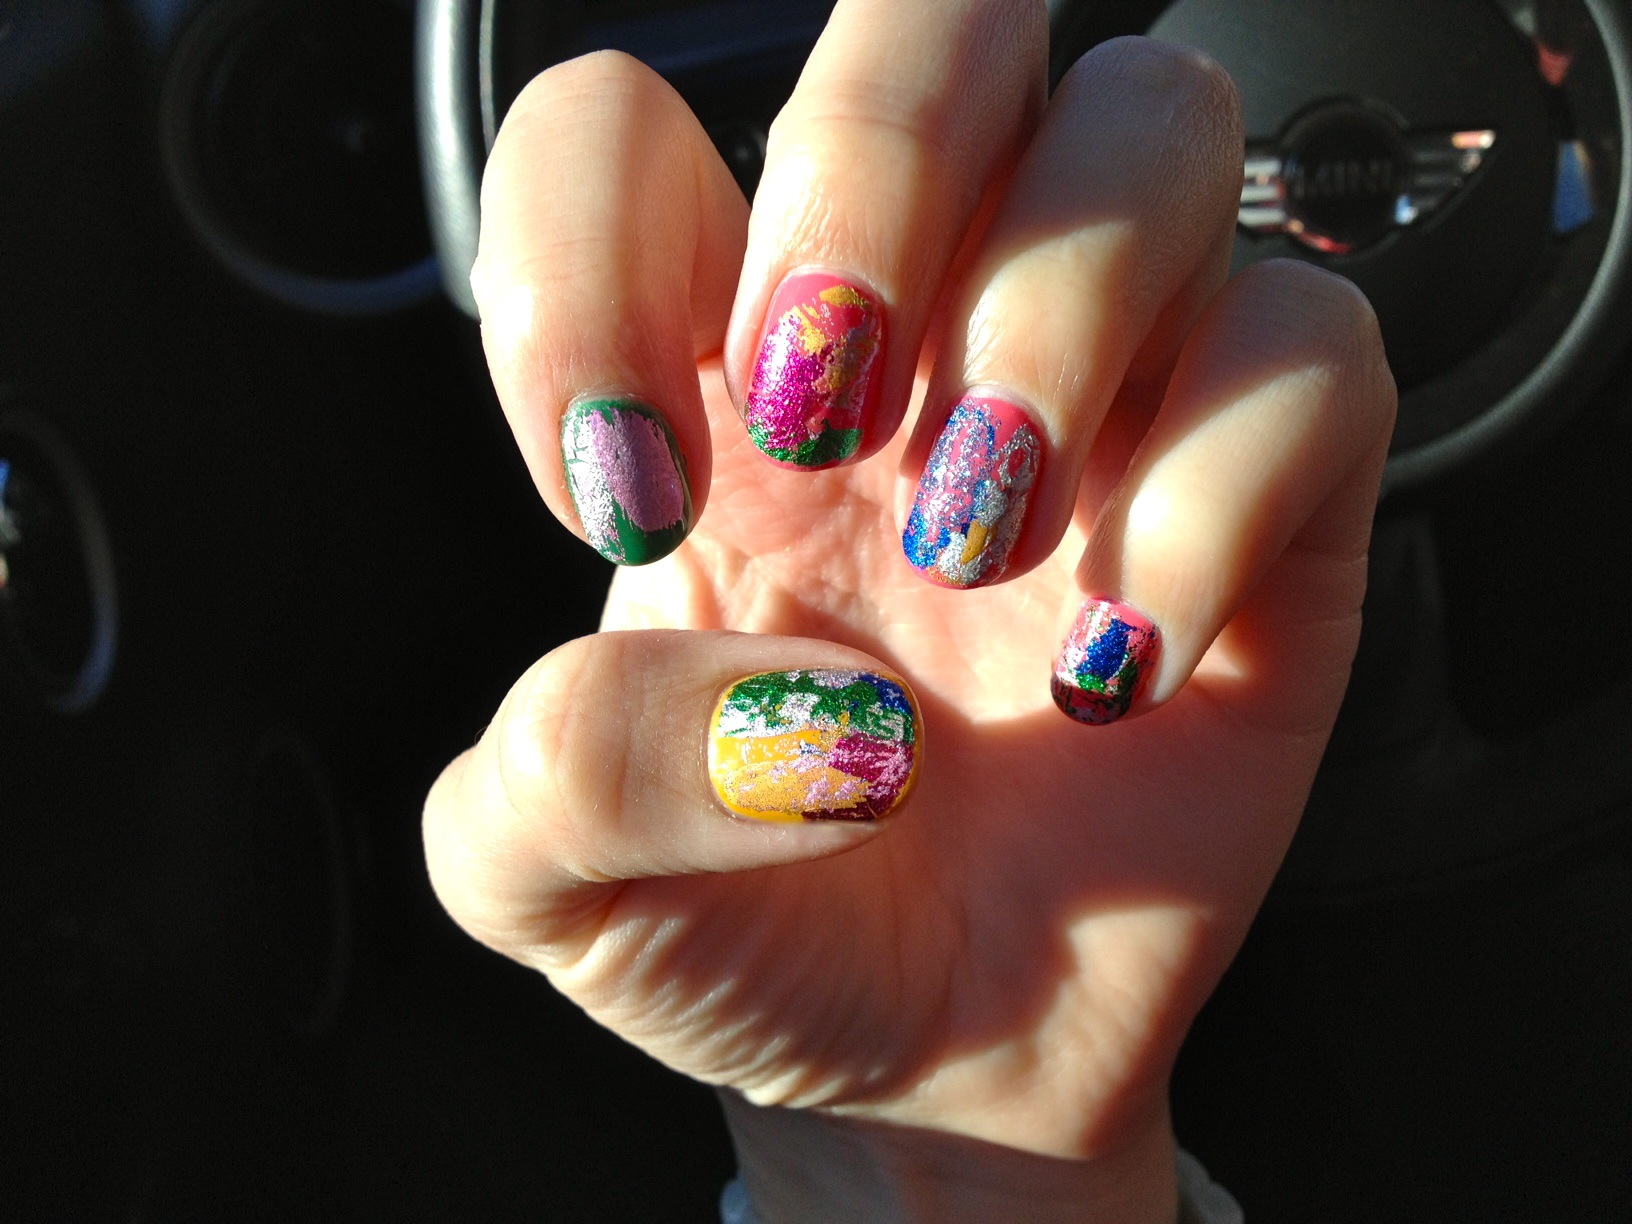
Overall, I loved the Ciaté Very Colourfoil Manicure™ Kit, but I'll admit it's a bit of a mixed bag. The DIY feel of the kit was awesome — doing my nails totally felt like an art project! I really enjoyed getting a feel for working with the foil. It's an imperfect exercise, so there's that element of the unexpected when you rip the foil off. You hope for the best and just try again if you didn't get what you wanted the first time.

The downside is that the foil doesn't last very long. You can count on this looking for for about 2 days, and after that the foil just begins to wear away. Another issue I encountered was an area of Foil Fix that never had foil properly adhere to it. The nature of Foil Fix is that a top coat won't really stick to it. Meaning, if you've got a patch of Foil Fix on your nail that doesn't get covered with foil, it will stay gummy. Gross.

Any questions on the Very Colourfoil™ Mani? Hit me up in the comments! And if you've liked what you've seen, then may I suggest you act soon? I've only seen the kit at Sephora and the website days it's limited edition!

foiledagain, Francesca

MAC — Holiday Nails

It's the day after christmas and we all still have full bellies and pieces of wrapping paper all over the floor!

I must be the very best sister in the world, because this year I bought each of my four sisters a beautiful MAC nail color.

Not to mention, that each of my sisters must have been on santa's "Nice" list, because they REALLY made out this year!

1. MAC's Immortal Gold for Anna.

(An antique gold color.  Gorgeous.)

2. MAC's Deep Sea for Bryanna.

(A deep teal.) 

3. MAC's Nightfall for Lauren.

(A really nice metallic, silvery with hints of black)

4. MAC's Rain of Flowers for Nicole.

(A deep blue with flecks of blue and purple sparkles.)

I am sorry to admit, I didn't even buy one for myself :(  What was I thinking?!?!  Definitely going back for a MAC polish of my own.

Stay tuned for a haul/swatch of these MAC colors, as I am sure I will be doing each of my sisters nails while I am home for the holidays!

Chevrons

A new tutorial. In the interest of time, because I am oooooooooh so tired, I am just giving it to you straight today.

Please insert witty and esoteric tidbits as you please....and forgive me as my brain is like soup at the moment (filled with psychobabble, perfectionism, and overwhelm).

First, cover nails in base coat.  Then paint nails in one, thick coat of Sinful Colors' Snow Me White, making sure you are free of streaks.

Let dry completely.  Then using tape, cut 10 small strips; one for each finger.  Using the corner of each strip, place at top of finger nail, making a triangle of sorts.

Then, using Savina's Coppersville, paint the remaining portion of your nail.  Let dry completely.

Once completely dry, gently and carefully remove tape from nails.

(This step looks so nice that you could end here.  Play with the colors a bit and have fun!  Continue to next step if you desire more....) 

Then using Milani's Nair Art in Art of Gold, carefully draw corresponding chevrons (Where the white meets the copper.  Or color A meets color B.)

(Practice with the nail art brush on a piece of paper first.  But I will say, this brush was fabulous and very easy to use!  Very impressed!)

Cover nails with top coat and marvel in your handiwork!

So many people have complimented me and these nails, often asking me "who did them?"  To which I graciously reply, "myself!"

But seriously, soooooo easy.  Try it out and let me know what you think!

XOXO, V

Snap, CRACKLE, Pop!

Well, less emphasis on the "snap" and "pop" part, and more emphasis on the "crackle" part. Crackle nail polish, that is!

I am not yet sure how I feel about crackle nail polish.  When I see pics of all the crackle nail art out there, I get jealous and think to myself, "ooooo, I want that!"  But then when I try it on myself, I am less than thrilled.

Maybe it's because my technique is wrong?  Maybe it's because my execution of the crackle nail art is all off?  Maybe it's because the crackle effect is just too busy for me?

Maybe it's a perfect storm of unsettling nail polish?!

I'll let you be the judge.

(OK, I admit I do like the look in this picture, but I think that had to do with my camera handy work, rather than the actual nail polish)

First, I painted my nails in a double coat of Confetti's Tazmanian Devil.  Then I did one, light coat in Sally Hansen's Crackle in Ink Splatter.  Then, of course, a top coat for shine!

(Much harder to see the glitter in the sun light.  Totally washed out.) 

Any reflections?

XOXO, Varnish

L'Ombre Rouge

Ombre, or 'to shade,' is all the rage these days! It's on the runway.

On the red carpet.

 On our nails.

And even in our hair.

Obviously, I am hooked on this ombre trend.  What can I say?!

Here is my little rendition of Ombre nails, which by the way, is a lot harder than it looks.  Although the shades of red may look great in the bottle, it is difficult to find the perfect the perfect crescendo of red.  Admittedly, I'm still working on it.

First, start with inspiration:

Then use a 3x5 card and play around with your reds to make sure they are similar in shade.

Then line your preferred bottles in order and get to work!

 (Mary Kay's Pulse/Palpitation, China Glaze's Fifth Avenue, OPI's Ruble For Your Thoughts, Essie's Cute As A Button, and Essie's Muchi Muchi)

XOXO, Varnish